Babel知识汇总

Babel使用方法:
总共存在三种方式:
- 使用单体文件 (standalone script)
- 命令行 (cli)
- 构建工具的插件 (webpack 的 babel-loader, rollup 的 rollup-plugin-babel)。
Babel原理
babel是如何做到将我们的一段代码(ES6、TypeScript、React)转成另外一段代码(ES5)的呢?
通过编译器。编译器是从一种源代码(原生语言)转换成另一种源代码(目标语言)。事实上我们可以将babel看成 JavaScript 编译器,更确切地说是源码到源码的编译器,通常也叫做“转换编译器(transpiler)”。 意思是说你为 Babel 提供一些 JavaScript 代码,Babel 更改这些代码,然后返回给你新生成的代码。
工作流程
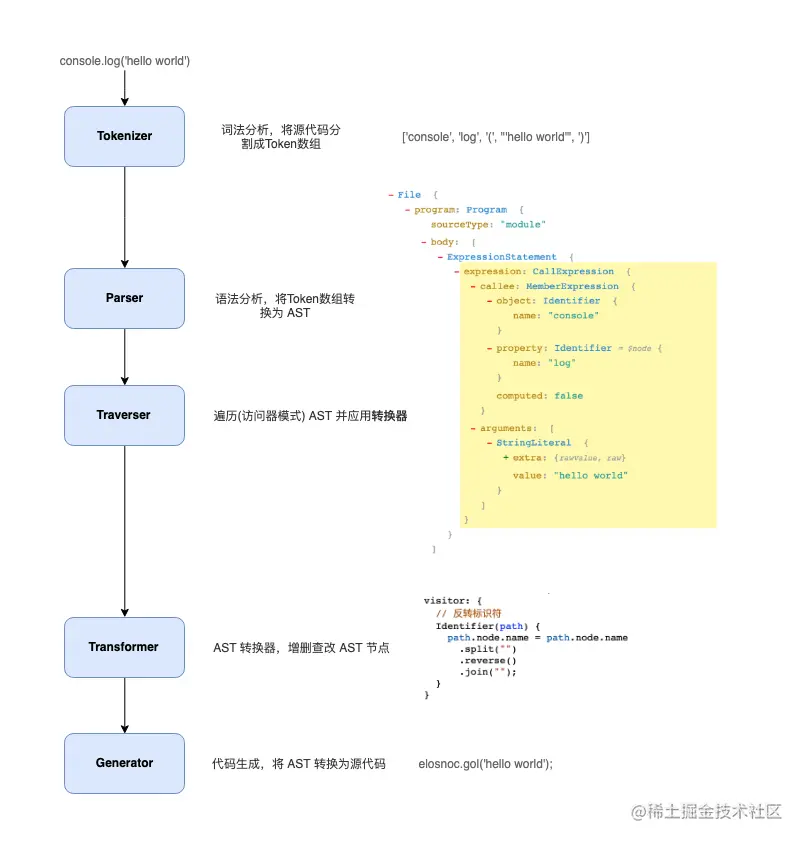
Babel也拥有编译器的工作流程:

上面只是一个简化版的编译器工具流程,在每个阶段又会有自己具体的工作:

解析阶段(Parsing)
将代码解析成抽象语法树(AST),每个JS引擎(比如Chrome浏览器中的V8引擎)都有自己的AST解析器,而Babel是通过@babel/parser实现的。
在解析过程中有两个阶段:词法分析和语法分析,词法分析阶段把字符串形式的代码转换为令牌(tokens)流,令牌类似于AST中节点;而语法分析阶段则会把一个令牌流转换成 AST的形式,同时这个阶段会把令牌中的信息转换成AST的表述结构。
词法解析(Lexical Analysis)
词法解析器(Tokenizer)在这个阶段将字符串形式的代码转换为Tokens(令牌),Tokens 可以视作是一些语法片段组成的数组
例如
1
| for (const item of items) {}
|
词法解析后的结果如下:
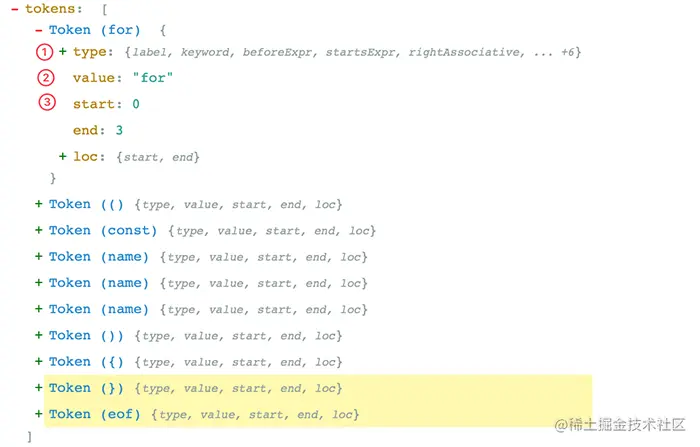
从上图可以看,每个 Token 中包含了语法片段、位置信息、以及一些类型信息。这些信息有助于后续的语法分析。
关于如何实现一个简易的词法解析器可以看这里
语法解析(Syntactic Analysis)
这个阶段语法解析器(Parser)会把Tokens转换为抽象语法树(Abstract Syntax Tree,AST)
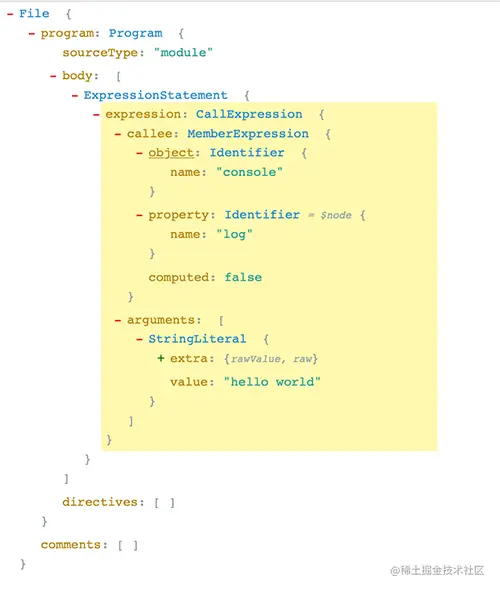
Program、CallExpression、Identifier 这些都是节点的类型,每个节点都是一个有意义的语法单元。 这些节点类型定义了一些属性来描述节点的信息。
AST 是 Babel 转译的核心数据结构,后续的操作都依赖于 AST
在这个阶段,Babel接受得到AST并通过babel-traverse对其进行深度优先遍历,在此过程中对节点进行添加、更新及移除操作。这部分也是Babel插件介入工作的部分。
生成阶段(Code Generation)
将经过转换得到的新的AST通过babel-generator再转换成js代码,过程就是深度优先遍历整个AST,然后构建可以表示转换后代码的字符串。
示例
原生源代码:
1
2
3
| const name = "coderwhy";
const foo = (name) => console.log(name);
foo(name);
|
经过词法分析得到token数组:
1
2
3
4
5
6
7
8
9
10
11
12
13
14
15
16
17
18
19
20
21
22
23
24
25
26
27
28
29
30
31
32
33
34
35
36
37
38
39
40
41
42
43
44
45
46
47
48
49
50
51
52
53
54
55
56
57
58
59
60
61
62
63
64
65
66
67
68
69
70
71
72
73
74
75
76
77
78
| [
{
"type": "Keyword",
"value": "const"
},
{
"type": "Identifier",
"value": "foo"
},
{
"type": "Punctuator",
"value": "="
},
{
"type": "Punctuator",
"value": "("
},
{
"type": "Identifier",
"value": "name"
},
{
"type": "Punctuator",
"value": ")"
},
{
"type": "Punctuator",
"value": "=>"
},
{
"type": "Identifier",
"value": "console"
},
{
"type": "Punctuator",
"value": "."
},
{
"type": "Identifier",
"value": "log"
},
{
"type": "Punctuator",
"value": "("
},
{
"type": "Identifier",
"value": "name"
},
{
"type": "Punctuator",
"value": ")"
},
{
"type": "Punctuator",
"value": ";"
},
{
"type": "Identifier",
"value": "foo"
},
{
"type": "Punctuator",
"value": "("
},
{
"type": "String",
"value": "\"coderwhy\""
},
{
"type": "Punctuator",
"value": ")"
},
{
"type": "Punctuator",
"value": ";"
}
]
|
通过语法分析得到AST:
1
2
3
4
5
6
7
8
9
10
11
12
13
14
15
16
17
18
19
20
21
22
23
24
25
26
27
28
29
30
31
32
33
34
35
36
37
38
39
40
41
42
43
44
45
46
47
48
49
50
51
52
53
54
55
56
57
58
59
60
61
62
63
64
65
66
67
68
69
70
| {
"type": "Program",
"body": [
{
"type": "VariableDeclaration",
"declarations": [
{
"type": "VariableDeclarator",
"id": {
"type": "Identifier",
"name": "foo"
},
"init": {
"type": "ArrowFunctionExpression",
"id": null,
"params": [
{
"type": "Identifier",
"name": "name"
}
],
"body": {
"type": "CallExpression",
"callee": {
"type": "MemberExpression",
"computed": false,
"object": {
"type": "Identifier",
"name": "console"
},
"property": {
"type": "Identifier",
"name": "log"
}
},
"arguments": [
{
"type": "Identifier",
"name": "name"
}
]
},
"generator": false,
"expression": true,
"async": false
}
}
],
"kind": "const"
},
{
"type": "ExpressionStatement",
"expression": {
"type": "CallExpression",
"callee": {
"type": "Identifier",
"name": "foo"
},
"arguments": [
{
"type": "Literal",
"value": "coderwhy",
"raw": "\"coderwhy\""
}
]
}
}
],
"sourceType": "script"
}
|
经过遍历、访问、应用所需的插件,生成新的AST:
1
2
3
4
5
6
7
8
9
10
11
12
13
14
15
16
17
18
19
20
21
22
23
24
25
26
27
28
29
30
31
32
33
34
35
36
37
38
39
40
41
42
43
44
45
46
47
48
49
50
51
52
53
54
55
56
57
58
59
60
61
62
63
64
65
66
67
68
69
70
71
72
73
74
75
76
77
78
79
80
81
| {
"type": "Program",
"body": [
{
"type": "VariableDeclaration",
"declarations": [
{
"type": "VariableDeclarator",
"id": {
"type": "Identifier",
"name": "foo"
},
"init": {
"type": "FunctionExpression",
"id": {
"type": "Identifier",
"name": "foo"
},
"params": [
{
"type": "Identifier",
"name": "name"
}
],
"body": {
"type": "BlockStatement",
"body": [
{
"type": "ReturnStatement",
"argument": {
"type": "CallExpression",
"callee": {
"type": "MemberExpression",
"computed": false,
"object": {
"type": "Identifier",
"name": "console"
},
"property": {
"type": "Identifier",
"name": "log"
}
},
"arguments": [
{
"type": "Identifier",
"name": "name"
}
]
}
}
]
},
"generator": false,
"expression": false,
"async": false
}
}
],
"kind": "var"
},
{
"type": "ExpressionStatement",
"expression": {
"type": "CallExpression",
"callee": {
"type": "Identifier",
"name": "foo"
},
"arguments": [
{
"type": "Literal",
"value": "coderwhy",
"raw": "\"coderwhy\""
}
]
}
}
],
"sourceType": "script"
}
|
最后得到目标源代码:
1
2
3
4
5
6
7
| var name = "coderwhy";
var foo = function (name) {
return console.log(name);
};
foo(name);
|
架构
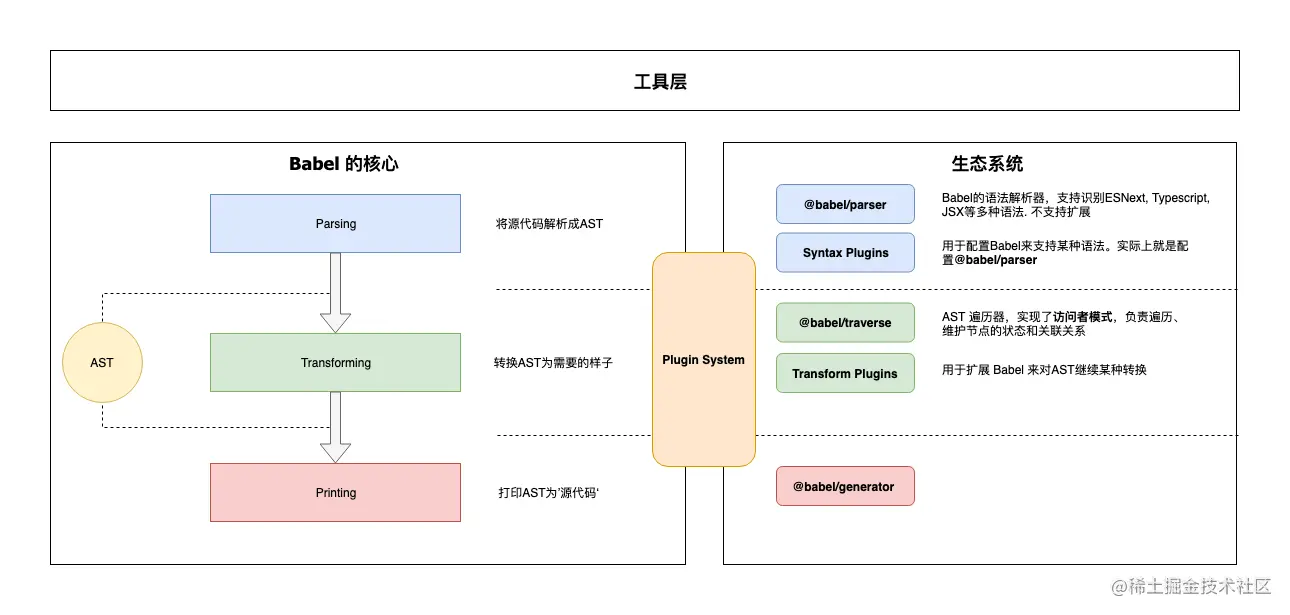
Babel 和 Webpack 为了适应复杂的定制需求和频繁的功能变化,都使用了微内核的架构风格。也就是说它们的核心非常小,大部分功能都是通过插件扩展实现的。
具体可参考《透过现象看本质: 常见的前端架构风格和案例🔥》
核心
@babel/core 这也是上面说的微内核架构中的内核。对于Babel来说,这个内核主要干这些事情:
- 加载和处理配置(config)
- 加载插件
- 调用
Parser 进行语法解析,生成 AST
- 调用
Traverser 遍历AST,并使用访问者模式应用插件对 AST 进行转换
- 生成代码,包括SourceMap转换和源代码生成
核心周边支撑
- **Parser(
@babel/parser)**: 将源代码解析为 AST 就靠它了。 它已经内置支持很多语法. 例如 JSX、Typescript、Flow、以及最新的ECMAScript规范。目前为了执行效率,parser是不支持扩展的,由官方进行维护。如果你要支持自定义语法,可以 fork 它,不过这种场景非常少。
- Traverser(
@babel/traverse): 实现了访问者模式,对 AST 进行遍历,转换插件 会通过它获取感兴趣的AST节点,对节点继续操作, 下面会详细介绍访问器模式
- **Generator(
@babel/generator)**: 将 AST 转换为源代码,支持 SourceMap
插件
打开 Babel 的源代码,会发现有好几种类型的插件
**语法插件(@babel/plugin-syntax-*)**:上面说了 @babel/parser 已经支持了很多 JavaScript 语法特性,Parser也不支持扩展. 因此plugin-syntax-\*实际上只是用于开启或者配置Parser的某个功能特性。
一般用户不需要关心这个,Transform 插件里面已经包含了相关的plugin-syntax-*插件了。用户也可以通过parserOpts配置项来直接配置 Parser
转换插件: 用于对 AST 进行转换, 实现转换为ES5代码、压缩、功能增强等目的. Babel仓库将转换插件划分为两种(只是命名上的区别):
@babel/plugin-transform-*: 普通的转换插件@babel/plugin-proposal-*: 还在’提议阶段’(非正式)的语言特性, 目前有这些
**预定义集合(@babel/presets-*)**: 插件集合或者分组,主要方便用户对插件进行管理和使用。比如preset-env含括所有的标准的最新特性; 再比如preset-react含括所有react相关的插件.
插件开发辅助
@babel/template: 某些场景直接操作AST太麻烦,就比如我们直接操作DOM一样,所以Babel实现了这么一个简单的模板引擎,可以将字符串代码转换为AST。比如在生成一些辅助代码(helper)时会用到这个库@babel/types: AST 节点构造器和断言. 插件开发时使用很频繁@babel/helper-*: 一些辅助器,用于辅助插件开发,例如简化AST操作@babel/helper: 辅助代码,单纯的语法转换可能无法让代码运行起来,比如低版本浏览器无法识别class关键字,这时候需要添加辅助代码,对class进行模拟。
工具
@babel/node: Node.js CLI, 通过它直接运行需要 Babel 处理的JavaScript文件@babel/register: Patch NodeJs 的require方法,支持导入需要Babel处理的JavaScript模块@babel/cli: CLI工具
访问者模式
转换器会遍历 AST 树,找出自己感兴趣的节点类型, 再进行转换操作. 这个过程和我们操作DOM树差不多,只不过目的不太一样。AST 遍历和转换一般会使用访问者模式。
想象一下,Babel 有那么多插件,如果每个插件自己去遍历AST,对不同的节点进行不同的操作,维护自己的状态。这样子不仅低效,它们的逻辑分散在各处,会让整个系统变得难以理解和调试, 最后插件之间关系就纠缠不清,乱成一锅粥。
**所以转换器操作 AST 一般都是使用访问器模式,由这个访问者(Visitor)来 **
① 进行统一的遍历操作,
② 提供节点的操作方法,
③ 响应式维护节点之间的关系;
而插件(设计模式中称为‘具体访问者’)只需要定义自己感兴趣的节点类型,当访问者访问到对应节点时,就调用插件的访问(visit)方法。
节点的遍历
假设我们的代码如下:
1
2
3
| function hello(v) {
console.log('hello' + v + '!')
}
|
解析后的 AST 结构如下:
1
2
3
4
5
6
7
8
9
10
11
12
13
14
15
16
17
18
19
20
21
22
23
24
25
26
27
28
29
30
31
32
33
34
35
36
37
38
39
40
41
42
43
44
45
46
47
48
49
50
51
52
53
54
55
56
57
58
59
60
61
62
63
64
65
66
67
68
69
70
71
72
73
74
75
76
77
78
79
80
81
82
83
84
85
86
87
88
89
90
91
92
93
94
95
96
97
98
99
100
101
| {
"type": "Program",
"start": 0,
"end": 58,
"body": [
{
"type": "FunctionDeclaration",
"start": 0,
"end": 58,
"id": {
"type": "Identifier",
"start": 9,
"end": 14,
"name": "hello"
},
"expression": false,
"generator": false,
"async": false,
"params": [
{
"type": "Identifier",
"start": 15,
"end": 16,
"name": "v"
}
],
"body": {
"type": "BlockStatement",
"start": 18,
"end": 58,
"body": [
{
"type": "ExpressionStatement",
"start": 24,
"end": 54,
"expression": {
"type": "CallExpression",
"start": 24,
"end": 54,
"callee": {
"type": "MemberExpression",
"start": 24,
"end": 35,
"object": {
"type": "Identifier",
"start": 24,
"end": 31,
"name": "console"
},
"property": {
"type": "Identifier",
"start": 32,
"end": 35,
"name": "log"
},
"computed": false,
"optional": false
},
"arguments": [
{
"type": "BinaryExpression",
"start": 36,
"end": 53,
"left": {
"type": "BinaryExpression",
"start": 36,
"end": 47,
"left": {
"type": "Literal",
"start": 36,
"end": 43,
"value": "hello",
"raw": "'hello'"
},
"operator": "+",
"right": {
"type": "Identifier",
"start": 46,
"end": 47,
"name": "v"
}
},
"operator": "+",
"right": {
"type": "Literal",
"start": 50,
"end": 53,
"value": "!",
"raw": "'!'"
}
}
],
"optional": false
}
}
]
}
}
],
"sourceType": "module"
}
|
还可以利用这个来看 (这个看起来比较方便)
访问者会以深度优先的顺序, 或者说递归地对 AST 进行遍历,其调用顺序如下图所示:
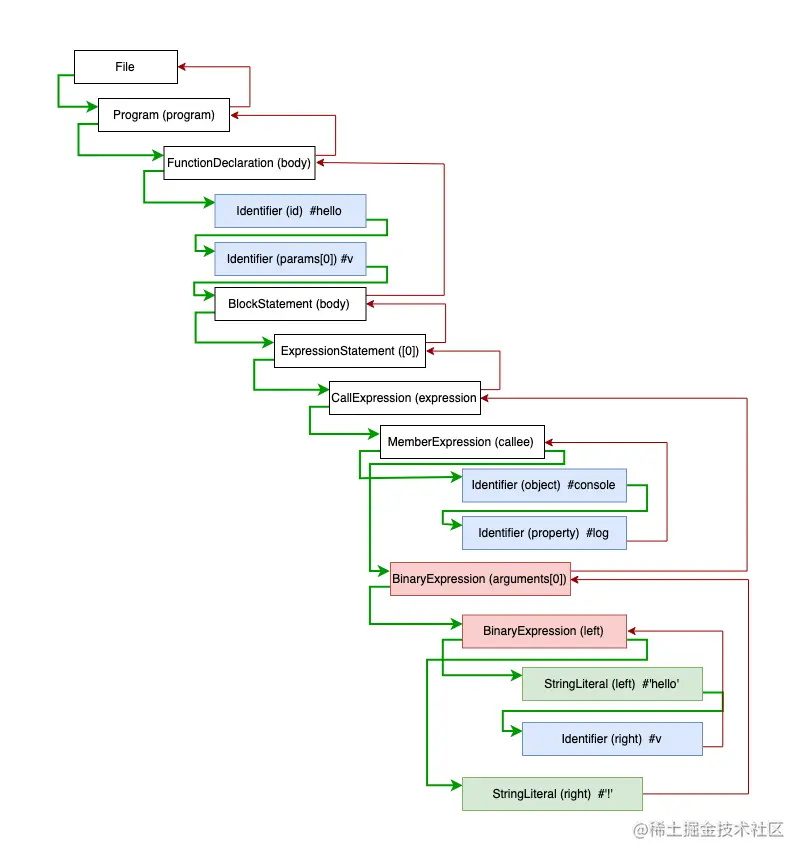
上图中绿线表示进入该节点,红线表示离开该节点。所以当创建访问者时你实际上有两次机会来访问一个节点。
下面写一个超简单的’具体访问者’来还原上面的遍历过程:
1
2
3
4
5
6
7
8
9
10
11
12
13
14
15
16
17
18
19
20
21
22
23
24
25
26
27
28
| const babel = require('@babel/core')
const traverse = require('@babel/traverse').default
const code = `
function hello(v) {
  console.log('hello' + v + '!')
}
`
const ast = babel.parseSync(code)
let depth = 0
traverse(ast, {
enter (path) {
console.log(`${printSpace(depth)}enter ${path.type}(${path.key})`)
depth++
},
exit (path) {
depth--
console.log(`${printSpace(depth)}exit ${path.type}(${path.key})`)
}
})
function printSpace (depth) {
space = ''
for (let i = 0; i < depth; i++)
space += ' '
return space
}
|

当访问者进入一个节点时就会调用 enter 方法,反之离开该节点时会调用 exit 方法
一般情况下,插件不会像上面那样直接使用enter方法,只会关注少数几个节点类型,所以具体访问者也可以这样声明访问方法:
1
2
3
4
5
6
7
8
9
10
11
12
13
14
15
16
17
18
19
20
| traverse(ast, {
Identifier(path) {
console.log(`enter Identifier`)
},
CallExpression(path) {
console.log(`enter CallExpression`)
},
BinaryExpression: {
enter(path) {},
exit(path) {},
},
"ExportNamedDeclaration|Flow"(path) {}
})
|
那么 Babel 插件是怎么被应用的呢?
Babel 会按照插件定义的顺序来应用访问方法,比如你注册了多个插件,babel-core 最后传递给访问器的数据结构大概长这样:
1
2
3
4
5
| {
Identifier: {
enter: [plugin-xx, plugin-yy,]
}
}
|
当进入一个节点时,这些插件会按照注册的顺序被执行。大部分插件是不需要开发者关心定义的顺序的,有少数的情况需要稍微注意以下,例如plugin-proposal-decorators:
1
2
3
4
5
6
| {
"plugins": [
"@babel/plugin-proposal-decorators",
"@babel/plugin-proposal-class-properties"
]
}
|
所有插件定义的顺序,按照惯例,应该是新的或者说实验性的插件在前面,老的插件定义在后面。因为可能需要新的插件将 AST 转换后,老的插件才能识别语法(向后兼容)。下面是官方配置例子, 为了确保先后兼容,stage-*阶段的插件先执行:
1
2
3
| {
"presets": ["es2015", "react", "stage-2"]
}
|
节点的上下文
访问者在访问一个节点时, 会无差别地调用 enter 方法,我们怎么知道这个节点在什么位置以及和其他节点的关联关系呢?
通过上面的代码,读者应该可以猜出几分,每个visit方法都接收一个 Path 对象, 你可以将它当做一个‘上下文’对象,类似于JQuery的 JQuery(const $el = $('.el')) 对象,这里面包含了很多信息:
- 当前节点信息
- 节点的关联信息。父节点、子节点、兄弟节点等等
- 作用域信息
- 上下文信息
- 节点操作方法。节点增删查改
- 断言方法。isXXX, assertXXX
下面是它的主要结构:
1
2
3
4
5
6
7
8
9
10
11
12
13
14
15
16
17
18
19
20
21
22
23
24
25
| export class NodePath<T = Node> {
constructor(hub: Hub, parent: Node);
parent: Node;
hub: Hub;
contexts: TraversalContext[];
data: object;
shouldSkip: boolean;
shouldStop: boolean;
removed: boolean;
state: any;
opts: object;
skipKeys: object;
parentPath: NodePath;
context: TraversalContext;
container: object | object[];
listKey: string;
inList: boolean;
parentKey: string;
key: string | number;
node: T;
scope: Scope;
type: T extends undefined | null ? string | null : string;
typeAnnotation: object;
}
|
副作用的处理
实际上访问者的工作比我们想象的要复杂的多,上面示范的是简单的静态 AST 的遍历过程。而 AST 转换本身是有副作用的,比如插件将旧的节点替换了,那么访问者就没有必要再向下访问旧节点了,而是继续访问新的节点
代码如下:
1
2
3
4
5
6
7
| traverse(ast, {
ExpressionStatement(path) {
const rtn = t.returnStatement(t.binaryExpression('+', t.stringLiteral('hello'), t.identifier('v')))
path.replaceWith(rtn)
},
}
|
上面的代码, 将console.log('hello' + v + '!')语句替换为return "hello" + v;, 下图是遍历的过程:
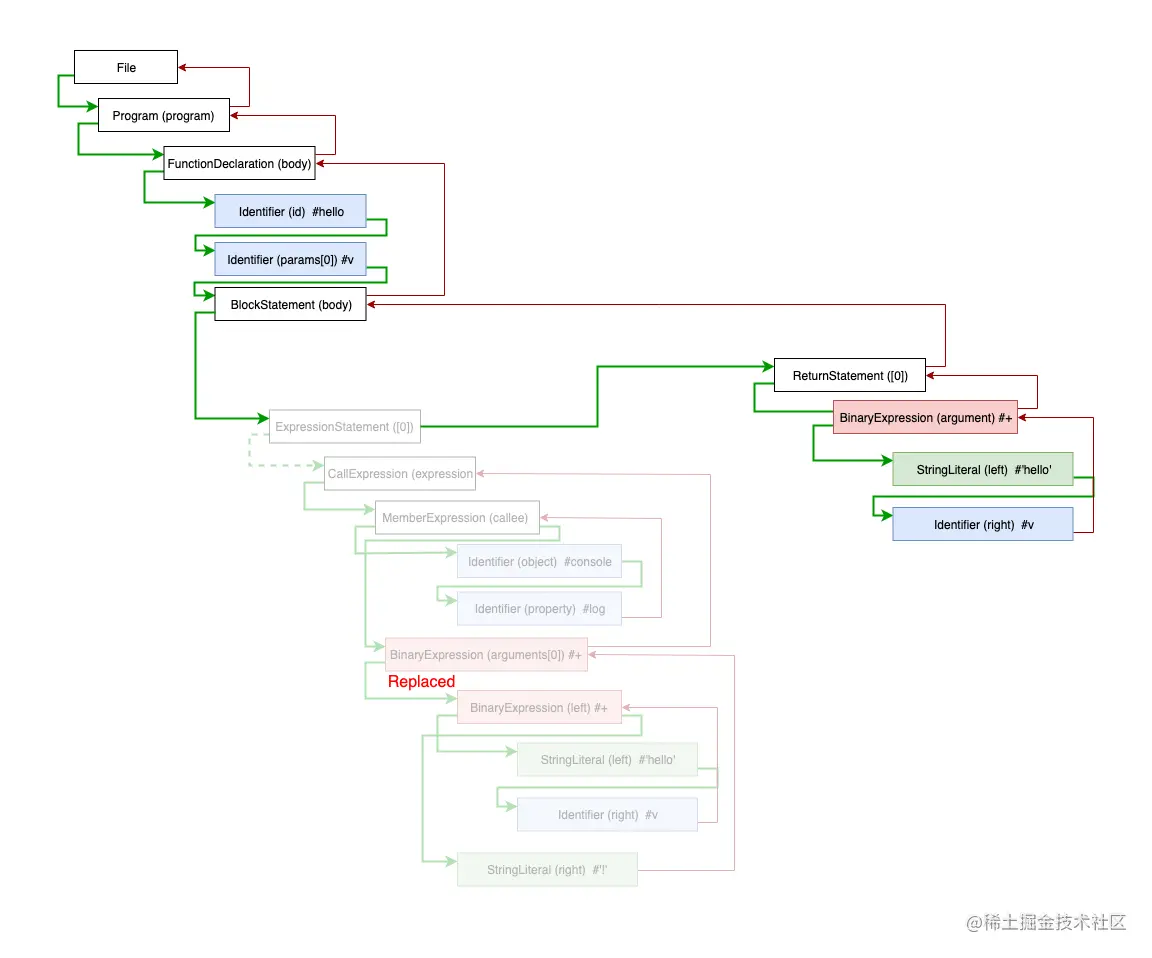
我们可以对 AST 进行任意的操作,比如删除父节点的兄弟节点、删除第一个子节点、新增兄弟节点… 当这些操作’污染’了 AST 树后,访问者需要记录这些状态,响应式(Reactive)更新 Path 对象的关联关系, 保证正确的遍历顺序,从而获得正确的转译结果。
实现一个Babel插件
预览
Before:
1
| const result = 1 + 2 + 3 + 4 + 5;
|
After:
以上的例子可能大家不会经常遇到,因为傻x才会这么写,但是有可能你会这么写
1
2
3
| setTimeout(function(){
}, 1000 * 2)
|
代码
1
2
3
4
5
6
7
8
9
10
11
12
13
14
15
16
17
18
19
20
21
22
23
24
25
26
27
28
29
30
31
32
33
34
35
36
37
38
39
40
41
42
43
44
45
46
47
48
49
50
51
52
53
54
55
| const babel = require("@babel/core");
const traverse = require("@babel/traverse").default;
const t = require("@babel/types");
const generate = require("@babel/generator").default;
const code = `const result = 100 + 2 * (10 + 10) - 50`;
const ast = babel.parseSync(code);
traverse(ast, {
BinaryExpression: {
exit(path) {
const node = path.node;
let result;
console.log(t.isNumericLiteral(node.left));
console.log(t.isNumericLiteral(node.right));
if (t.isNumericLiteral(node.left) && t.isNumericLiteral(node.right)) {
switch (node.operator) {
case "+":
result = node.left.value + node.right.value;
break;
case "-":
result = node.left.value - node.right.value;
break;
case "*":
result = node.left.value * node.right.value;
break;
case "/":
result = node.left.value / node.right.value;
break;
case "**":
let i = node.right.value;
while (--i) {
result = result || node.left.value;
result = result * node.left.value;
}
break;
default:
}
if (result !== undefined) {
path.replaceWith(t.numericLiteral(result));
}
}
},
},
});
console.log(generate(ast).code);
|

当code为
1
2
3
| const code = `setTimeout(function() {
// do something
}, 1000 * 2);`;
|

也是可以成功实现的
坑
首先这里有一个坑:
如果不是在exit对节点进行操作,而是在enter的话,结果就是

这是因为
你会发现Babel解析成表达式里面再嵌套表达式:
1
| 表达式( 表达式( 100 + 表达式( 2 * 表达式( 10 + 10 ) ) ) - 50 )
|
而我们的判断条件并不符合所有的,只符合10 + 10
1
2
|
if (t.isNumericLiteral(node.left) && t.isNumericLiteral(node.right)) {}
|
所以我们在exit对其节点进行操作:
第一次计算10 + 10之后,我们会得到这样的表达式
1
| -> 表达式( 表达式( 100 + 表达式( 2 * 20 ) ) - 50
|
其中 2 * 20又符合了我们的条件, 我们通过向上递归的方式遍历父级节点
又转换成这样:
1
2
3
| -> 表达式( 表达式( 100 + 40 ) - 50 )
-> 表达式( 140 - 50 )
-> 90
|
拓展
如果转换这样呢: const result = 0.1 + 0.2;
预期肯定是0.3, 但是实际上,Javascript有浮点计算误差,得出的结果是0.30000000000000004
那是不是这个插件就没卵用?
这就需要你去矫正浮点运算误差了,可以使用Big.js;
比如: result = node.left.value + node.right.value; 改成 result = +new Big(node.left.value).plus(node.right.value);
你以为完了吗? 这个插件还可以做很多
比如: Math.PI * 2 >>> 6.283185307179586
比如: Math.pow(2, 2) >>> 4
所以,有时间的话,可以继续拓展,成为一个能对数字进行一些处理的Babel插件
ref
https://juejin.cn/post/6844903566809759758
使用单体文件 (standalone script)
具体参考:https://babeljs.io/docs/en/babel-standalone
这种方式也用得比较少
一个简单的示例:
1
2
3
4
5
6
7
8
9
10
11
12
13
14
15
16
17
18
19
20
21
22
| <!DOCTYPE html>
<html lang="en">
<head>
<meta charset="UTF-8">
<meta http-equiv="X-UA-Compatible" content="IE=edge">
<meta name="viewport" content="width=device-width, initial-scale=1.0">
<title>Document</title>
</head>
<body>
<div id="output"></div>
<script src="https://unpkg.com/@babel/standalone/babel.min.js"></script>
<script type="text/babel">
const getMessage = () => "Hello World";
document.getElementById("output").innerHTML = getMessage();
</script>
</body>
</html>
|
命令行使用Babel

目前的项目目录

1
2
3
4
5
6
7
8
9
|
const msg = 'Hello World'
const foo = (info) => {
console.log(info);
}
foo(msg)
|
1
| npx babel src --out-dir result
|
1
2
3
4
5
6
7
8
9
|
const msg = 'Hello World';
const foo = info => {
console.log(info);
};
foo(msg);
|
但是可以看到,转换结果与原结果没有什么不同
如果想要转换箭头函数和const的话,是需要安装插件的,分别是 @babel/plugin-transform-arrow-functions 和 @babel/plugin-transform-block-scoping
1
| npx babel src --out-dir result --plugins=@babel/plugin-transform-arrow-functions,@babel/plugin-transform-block-scoping
|
1
2
3
4
5
6
7
8
|
var msg = 'Hello World';
var foo = function (info) {
console.log(info);
};
foo(msg);
|
可以看到转换成功了
但是如果要转换的内容过多,一个个安装设置插件是比较麻烦的,我们可以使用预设(preset),即插件 @babel/preset-env :
1
| npx babel src --out-dir dist --presets=@babel/preset-env
|
1
2
3
4
5
6
7
8
|
var msg = 'Hello World';
var foo = function (info) {
console.log(info);
};
foo(msg);
|
可以看到,转换成功了
构建工具的插件 (webpack 的 babel-loader等)
在实际开发中,我们通常会在构建工具中通过配置babel来对其进行使用的,比如在webpack中。
那么我们就需要去安装相关的依赖:
1
| npm install babel-loader @babel/core
|
我们可以设置一个规则,在加载js文件时,使用我们的babel,同时还需指定使用的插件才会生效:
1
2
3
4
5
6
7
8
9
10
11
12
13
14
15
16
17
18
19
20
| module.exports = {
...
module: {
rules: [
{
test: /\.js$/,
use: {
loader: 'babel-loader',
options: {
plugins: [
'@babel/plugin-transform-arrow-functions',
'@babel/plugin-transform-block-scoping'
]
}
}
}
]
},
...
}
|
如果我们一个个去安装使用插件,那么需要手动来管理大量的babel插件,同时我们也不太清楚我们想要兼容的浏览器到底需要使用哪些插件,这里我们可以直接给webpack提供一个 preset,webpack会根据我们的预设来加载对应的插件列表,并且将其传递给babel。
常见的预设有三个:
env
安装@babel/preset-env
然后设置:
1
2
3
4
5
6
7
8
9
10
11
12
13
14
15
16
17
18
19
| module.exports = {
...
module: {
rules: [
{
test: /\.js$/,
use: {
loader: 'babel-loader',
options: {
presets: [
["@babel/preset-env"]
]
}
}
}
]
},
...
}
|
打包后:

可以看到转换成功
需要注意,这里没有安装@babel/plugin-transform-arrow-functions 和 @babel/plugin-transform-block-scoping 等其他插件,只安装了 @babel/core 和 @babel/preset-env
这里需要注意,@babel/preset-env会根据我们的 browserslist 的设置去兼容浏览器,如果我们设置browserslist为
1
2
3
| "browserslist": [
"chrome 99"
]
|
打包后可以发现,箭头函数和const并没有被转换

react
TypeScript
Stage-X


ployfill


接着在babel.config.js里面设置:
1
2
3
4
5
6
7
8
| module.exports = {
presets: [
["@babel/preset-env", {
useBuiltIns: 'usage',
corejs: 3
}]
]
}
|
1
2
3
4
5
6
7
8
9
10
11
12
13
| module.exports = {
...
module: {
rules: [
{
test: /\.js$/,
exclude: /node_modules/,
use: ['babel-loader']
}
]
},
...
}
|

可以看到使用了ployfill之后,一个promise就多了三千行代码😓
useBuiltIns


React的jsx支持

TypeScript的支持

如果我们希望在webpack中使用TypeScript,有两种方式
ts-loader
那么我们可以使用ts-loader来处理ts文件:
安装ts-loader后
1
2
3
4
5
6
7
8
9
10
11
12
13
14
| module.exports = {
...
entry: './src/index.ts',
module: {
rules: [
{
test: /\.ts$/,
exclude:''
use:'ts-loader'
}
]
},
...
}
|
1
2
3
|
const a: string = 'hello';
console.log(a);
|

可以看到使用成功
babel-loader
还可以直接使用babel去支持ts
1
2
3
4
5
6
7
8
9
10
11
12
13
14
| module.exports = {
...
entry: './src/index.ts',
module: {
rules: [
{
test: /\.ts$/,
exclude: /node_modules/,
use: ['babel-loader']
}
]
},
...
}
|
1
2
3
4
5
6
7
8
9
10
|
module.exports = {
presets: [
["@babel/preset-env", {
useBuiltIns: 'usage',
corejs: 3
}],
["@babel/preset-typescript"]
]
}
|

选择哪个?
那么我们在开发中应该选择ts-loader还是babel-loader呢?
那么在开发中,我们该如何选择呢?
https://www.typescriptlang.org/docs/handbook/babel-with-typescript.html

当然,使用vsc的话,只会直接在代码提示报错的,但是有些IDE不会,所以vsc👍
ref
Babel 插件手册
深入浅出 Babel 上篇:架构和原理 + 实战
深入Babel,这一篇就够了
面试官(7): 聊一聊 Babel?
AST 节点类型对照表
astexplorer
jointjsast


